Monday, December 28, 2015

New Favorite Flour Mixes

The are so many more flours available now then when we first started the gf journey and so many different versions of the traditional flour mix (rice flour, tapioca, and potato starch) out there that I felt I should try them out.  When I was at the grocery store I saw this book with a couple of flour mixes and thought I'd try it.


I have fallen in love with it! I have found the flour mixes to be perfect for every recipe I have made and significantly less gritty. As always, when you use either to make one of your own recipes use about 1/2 tsp xantham gum/1C flour mix.

All-Purpose Flour mix
1 C white rice flour
1 C sorghum flour
1 C tapioca flour
1 C cornstarch
1 C almond or coconut (I did a 1/2 C of each)

Bread flour mix
1 C brown rice flour
1 C sorghum flour
1 C tapioca flour
1 C cornstarch
3/4 C millet
1/3 C instant mashed potato flakes

Thursday, March 10, 2011

Basic GF Cooking Tips

(printer friendly version)

Recently, a friend of mine contacted me about eating GF.  At the same time I was asked to give a class on preparing GF meals for church.  The class is aimed at those who aren't GF, but may need to bring someone a meal with GF issues.  We are also addressing food allergies and diabetes and other special diets.  As a result I have been coming up with some basic GF cooking tips and thought I'd pass them along.


-You can not use any cooking ingredients that use Wheat, Rye, Barley or non-GF Oats, or any version of these ingredients.  Find a list of unsafe versions of these ingredients and use it!
     Seems silly to say if you are GF, but for the group I'm presenting to, this is rule #1, so I am adding it here.

-READ LABELS!  They identify Wheat in the allergens section but not Rye and Barley.  Look out especially for malt flavoring, a very common ingredient that is a derivative of barley.

-Buy a new toaster and waffle iron.  Your old ones are contaminated and will make you sick.  We have two toasters and just buy our GF waffles for cupboard space reasons.  For the toasters we have one for everyone else and one labeled with big vinyl letters "GF".

-When thinking about what to eat, stop thinking about what you can't eat.  Write down what you normally cook and you may notice that a lot of what you normally eat is naturally GF or only needs a small adaptation.

-I am incredibly brand loyal.  If you take the time to label products GF or tell me you will always identify gluten ingredients and they will never be hidden (Kraft and McCormick, for example), I will be your friend for life.  I also love grocery stories that identify GF foods (Trader Joe's is my favorite).

-If you don't use mixes normally and you are going to run a GF and non-GF house.  Invest or make some.  It will make cooking meals so much easier.  I usually mix up several bread mixes to keep in the freezer to save time on bread.  I also keep a pancake mix around to make breakfast go faster.  I also buy GF waffles to save cupboard space so I don't have 2 waffle irons around.

-Thicken with cornstarch or potato flour if you need to thicken something.  Once you get in the habit of cooking GF you may find other alternatives.  These are just easy ones to start with.

-Season with herbs and spices and not seasoning packets, you can find mixes all over the internet that are strictly herbs & spices.  I usually just season by taste anymore.

-Gluten can be found in soy sauce, bbq sauce, all condensed soups, some spaghetti sauces, seasoning packets (taco seasoning, spaghetti sauce mix, dressing mixes, etc.), cold cereals, salsas, etc.  You will constantly be surprised where it will pop up.  Read labels.

-Use clean plastic cutting boards (do not use wood cutting boards, they trap gluten and can not be completely cleaned of gluten), plates, knives, etc.  If you are unsure about whether a dish has touched gluten, DON'T USE IT!!!
         -- I never set food that is GF directly on the counter. Even if the counter is clean, I can't guarantee someone didn't stick something with gluten on there when I wasn't looking.

-If you are going to make GF food and food with gluten, make the GF first to avoid contamination.

-If you have any questions about whether something is GF, Google!  If you can't find the answer then call the company.  If all else fails, find something else to use.

-Casseroles are rife with gluten challenges.  Approach them carefully and be prepared to do some major adapting.  Or, like us, figure out the ones you like the best and say goodbye to the rest.  You will eat healthier, hopefully.

-Just because something says “Wheat-Free” does not mean it is GF. Newman's Own has a wheat free Oreo-like cookie that has rye -- Yep, learned that the hard way.  Luckily, my daughter didn't try if before we figured it out.

-I don't worry about "may contain ______" statements.   I feel that is more for their liability than my safety, which means it isn't worth my hassle.  It is my understanding that the FDA cleaning requirements for manufacturing equipment are pretty severe, so the likelihood of contamination is VERY small.  We’ve never had a problem with my daughter and GF contamination and I have a son with a SEVERE peanut allergy (smelling peanuts causes a reaction) and he has also never had a problem.  That said, this is my opinion and our family's decision, and you need to decide what the appropriate level of risk is for you and your family should be by researching it yourself.

-For a hamburger or other sandwich, if you don't want or have GF bread, use lettuce as your bun.  Or just use a fork and knife.  My non-GF sister has started choosing to eat a hamburger with a lettuce bun so she can save her calories for the cookies.

-Keep some mixed up flour handy in your kitchen and store the remaining flours in the freezer.  GF flour can go rancid quicker than regular flour.

I'm sure I will add to this as I think of other things.  This is just the beginning.  If you think of other tips let me know and I will add them to the list.

Monday, January 31, 2011

Crockpot Roast with Potatoes

Last year for Mother's Day my sister was asked to speak in church on what she had learned from our mother.  My sister is a wonderful writer and has a real talent for putting her thoughts into words.  I have always admired this about her.  Anyway, the way she wrote the talk was to talk about how my mother did not necessarily preach to us, but through everyday things she taught us about life and about the importance of faith.  One of those everyday things she used as an example is making a roast.  The first step to a good roast is to heat a skillet as hot as possible and brown the roast on all sides until it is ALMOST burned.  You don't have to do it, but the roast will taste so much better if you do.  She compared this to life.  How often we have to be "burned" to learn the lessons we need to learn and to have the greatest "flavor" and wisdom.  Ever since my mother told me about the talk I can not cook a roast without being reminded of this great lesson in life.  So I am passing it on to you.

Crockpot Roast with Potatoes (printer friendly)
3-4 lb roast
1 onion sliced
 salt & pepper to taste
1/4 tsp garlic powder
1 tsp dried thyme
1/2 C beef broth
4 med-large potatoes, cut into large pieces

1. Heat a large skillet over high heat.  Using tongs brown the roast on all sides until dark golden brown (almost burnt)
Looks good already doesn't it.

Even better

2. Slice the onion.  Place 1/2 the slices on the bottom of your crockpot.


3.  Add the seared roast and sprinkle with seasonings.

4. Add potatoes and remaining onions and pour over the broth.

 
5. Cover the crockpot and cook on low 6-8 hours or high 3-4.
6. Next remove the roast from the crockpot (leave the potatoes in to stay warm until you are ready to serve them)  to a plate and pour some of the remaining sauce over the roast and allow to sit for at least 10-15 minutes.  I always worried about this because I HATE cold food, but it really makes a difference.  The roast has a chance to cool enough to hold the moisture in, instead of it all escaping as steam when you cut it.  When you serve it, pour some more of the remaining broth over it and enjoy!

Monday, January 24, 2011

Tuna Patties

I made these several months ago and our whole family loved them.  They are really simple, and a great pantry food.  For GF bread crumbs I strongly recommend processing Rice Chex.  They are relatively cheap and don't have much flavor so just the flavor of the food comes through.

Tuna Patties (printer friendly)
3 (6 oz) cans of tuna, drained & flaked
3 eggs
1 1/2 tsp mustard

3 T onion, minced
1 clove of garlic, minced
1 tsp pepper
1/8 tsp dill
3/4 C bread crumbs
3 T veg oil

1. In a medium bowl combine the tuna, eggs, mustardm onion, garlic, pepper, and dill.


Mix until combined.  Then add the bread crumbs.


Mix with your hands until the mixture is the consistency of cookie dough.

2. Shape into 6 patties.
3. Heat a large skillet over medium heat.  Add the oil and swirl around.  Add the patties.  Cook on both sides until lightly brown.
4. Serve as a a sandwich with pickles, mayo, lettuce, etc.  Or just eat plain.  We had ours with sweet potato fries.  YUM!

Monday, January 17, 2011

Snow Cone Syrup


Last month I taught preschool as a part of a preschool with a group of mom's.  Our topic was snow and for our treat we had snowcones.  I got a snowcone maker a few years ago and have had a lot of fun with it.  But this was my first attempt at making my own syrup.  I made the syrup the way I make my maple syrup and it turned out too thick.  That said it was delicious.  Here is the recipe with a thinner syrup.

Snow Cones (printer friendly)
2 C water
2 C sugar
Candy flavoring

1. In a saucepan combine the water and sugar.  Bring to a boil and allow to boil for 1 minute.  Remove from stove.


You can flavor the whole batch or separate into different bowls for flavoring.  Add about 1/8 tsp flavoring to each bowl.  Taste and add more flavoring as needed.  Color with food coloring if desired
I made, pina colada, lemon, and raspberry.

Monday, January 10, 2011

Mexican Rice


 I'm sure I have mentioned this before, but I love Mexican food. I love the cheese, I love the spice (just not too spicy, I still want to taste my food), I love the sauces, I love salsa, I love the corn tortillas, I love the beans, I love the corn, . . . Need I go on.  Anyway, the other day I made fajitas and thought how if we were at a restaurant they would serve these with rice and beans.  So I went looking for a good Mexican rice recipe and found one in my trusty The America's Test Kitchen Family Cookbook.  With a little adapting for spiciness and lack of a few ingredients it got made and was delicious!

Mexican Rice (printer friendly)
1 can of tomatoes
1 small onion, pealed, trimmed & quartered
1/3 C vegetable oil
2 C long grain rice
4 garlic cloves, minced
1 can diced jalepenos
2 C chicken broth
1 T tomato paste
1 1/2 t salt
2 1/2 T dried cilantro or 1/2 C fresh
Pepper
Lime juice

1. Preheat oven to 350 degrees and place the rack in the middle.  Puree the tomatoes and onion in the food processor. There should be 2 Cups of puree. Remove any excess so there is only 2 C.
I made A LOT of this since I wanted to freeze it for later.  So you would have a lot less than this for this recipe.

2.Heat the oil on med. heat in an oven proof dutch oven or pot.  Add the rice and saute until light golden brown.  This should take approx 10 minutes (lots more if you are quadrupling it like I did).  Make sure to stir often so the rice doesn't burn.


3.  Stir in the garlic and the can of jalepenos.  Cook until it smells like garlic & jalepenos (about 15 seconds).  Add the pureed tomatoes/onion mixture, broth, tomato paste, salt and cilantro (if using dried). 

Bring to a boil and then cover and bake for about 30-35 minutes or until all the liquid is dissolved and the rice is fully cooked. Be sure to stir after 15 minutes.
4.  Fluff with a fork and add cilantro (if fresh) and add some fresh jalepenos, if desired.

Saturday, January 8, 2011

GF Bread Crumbs

I finally solved the GF bread crumb dilemma.  I know, after 3 years you think I would have figured this out before now.  But here it is.  Take Rice Chex or any other GF cereal, throw them in the food processor and process until crumbs.  Then throw in a freezer bag and freeze for later use.  Why didn't I think of this earlier?

Thursday, January 6, 2011

Chicken Fajitas


We love fajitas.  I use to use mixes, but of course, with the whole GF thing that is less of an option.  I know there are GF mixes, but I must admilt I have come to enjoy making my own.  I use a recipe from The America's Test Kitchen Family Cookbook which is one of my many cookbooks I LOVE.

Chicken Fajitas (printer friendly)
2 chicken breast halves, sliced about a 1/2 inch
2 T Veg Oil
2 T lime juice
salt & pepper to taste
1 med onion, sliced thin
1 green pepper, sliced thin*
1 red pepper, sliced thin*
1 tsp chili powder
1 tsp cumin
2-4 tsp water
Corn Tortillas
Sour Cream (opt)
Guacamole (opt)
Cheese (opt)

1. Heat a large skillet on med-high heat.  Add 1 T oil and swirl around pan.  Add chicken and salt & pepper.  Saute until cooked through and browned.  Remove to a bowl and add lime juice.  Toss to thoroughly coat.

2. In the skillet, add the remaining oil and add the onions and peppers, along with the chili powder and cumin along with salt and pepper to taste.  Saute until the onions are soft and translucent.  Add water as needed so they don't burn.

3. Add chicken and stir until it all combined and the seasoning is evenly distributed.
4. Serve on tortillas with sour cream, guacamole and cheese and any other toppings you desire.

Santa's Workshop

This is what my parents always called their homemade projects prior to Christmas.  "I am going to be doing Santa's Workshop" was a common phrase.  Let's just say this year was big on Santa's workshop -- and I should add, low on house cleaning.  My friend Valerie once said that "you can either have a clean house or do projects, you can't have both."  While there are some that are organized enough to do both, I am not.  Anyway, on to projects, almost all are inspired or direct copies of others, my very best skill.

 I have a BIL that is an IT person so I found these phrases at ThinkGeek.com and thought they'd be perfect for them.  I then cut the vinyl with my Silhouette and put them on painted boards.  I especially love the pixels one.  Found a great dotted font and removed some of the dots.

We had a 3 year old cousin this year and when I saw this Princess in the Pea set at Sewing in No Man's Land  I knew I was making it for her.  We are also using it as a learn to sew lesson since it is so simple.  One note, don't fill the pillows too much or they don't stack as well.


I did these for my mom who decorates her Dining Room table for each month.  I this could be a fun addition.  I originally got the idea with the Along Came a Spider picture from a Halloween Print at Serving Pink Lemonade and it went from there.  Once again, I love my Silhouette.

I made one of these Menu Boards for me a while back and had a SIL and a sister that both mentioned they needed to figure out a way of doing menus so I made one for them, which was especially helpful since we had them for Christmas.

I also made them each a Family Home Evening Chart that I adapted from the Chore Chart at How Does She.


And finally, (not including the Pj's and the Christmas Dresses) I made a felt fishing set from U Create  for both my nephews and one for my 18 month old.

You'd think by now I'd be tired of sewing, but, honestly, now I just want to sew some more.  Aprons?  Cute skirts for my girls? The robes for my 2 oldest that I bought the fabric for and ran out of time to make. 

That said, before I do anything, my sewing room HAS to be cleaned!!!

Monday, November 15, 2010

Chocolate Carmeled Cookies


I can not take credit for this recipe, my 7 year old son dreamed this up with his friend the other day and I came into the kitchen in the middle of them making it.  I have to say, they came up with a delicious recipe.  Basically, it is a twist on Rice Krispie treats.  The name is also a result of my son as he named them.

The Concoction (printer friendly)
4 C miniature marshmallows
1 C chocolate chips
10 caramels, unwrapped & quartered
1/2 C coconut
2 T butter
5 C corn or rice check
1/3 C whole almonds

1. In a large microwave bowl combine the marshmallows, chocolate chips, caramels, coconut, and butter.


Microwave for about 2 minutes.  Keep an eye on it so it doesn't go over the bowl.


2. Meanwhile, chop the almonds.
3. When the marshmallow mixture is done, stir it and add the Chex.  After it is mixed well, sprinkle with chopped almonds and stir again.
4. Place spoonfuls on wax paper and allow them to cool (if you can wait that long).  Makes about 2 doz.

Sunday, November 7, 2010

Johnnycakes


For our kids birthdays we always get them a book.  This year for my son, who is just starting chapter books, I found these Magic Tree House-like books called The Enchanted Tunnel series.  It is an LDS (Mormon) series and the first book finds the brother and sister arriving on a pioneer trek.  My son has LOVED this book.  For him, one of the best parts is a recipe for "Johnnycakes."  Pioneers often cooked these in the morning and then they would wrap them up in a handkerchief and put them in their pockets where they would stay warm.  While not especially hygienic, they were practical for "fast food" on the long walk West.  Since my son started the book the number of times he asked for me to make these is incalculable.  Finally, I relented, and it was one of the best decisions I made.

Basically, they are a cross between a Southern cornbread and a pancake.  The first time we ate them we treated them like a pancake with butter and syrup.  This time thought I thought we would branch out and offer pancake toppings and taco toppings, kind of a Navajo Taco without fry bread.  Both ways are delicious. I then sent them as the bread for a sandwich the next day.  I also think they would be great served plain, perhaps as a side in a meal. 

Johnnycakes (printer friendly)
1 1/4 C flour mix
3/4 C cornmeal
1/2 tsp salt
2 tsp baking powder
1/2 t xanthan gum
1 egg beaten
1 C milk (whatever kind you have)
1/4 C melted butter (or oil)

1. In a medium mixing bowl, combine the flour, cornmeal, salt, baking powder, and xanthan gum.  In a separate bowl combine the egg, milk and melted butter.  Add the egg mixture to the dry mixture and mix just until combined.
2.  Cook one of the following ways:
--Pour into a greased 9x13 pan and bake on 400-degrees for 30 minutes
--Heat a greased skillet (or griddle) on medium-high heat and pour 1/4 C batter for each "cake."    Turn when the top looks bubbly.

Here are photos of two of our favorite ways to eat them.
 Main Course

Dessert

Monday, October 25, 2010

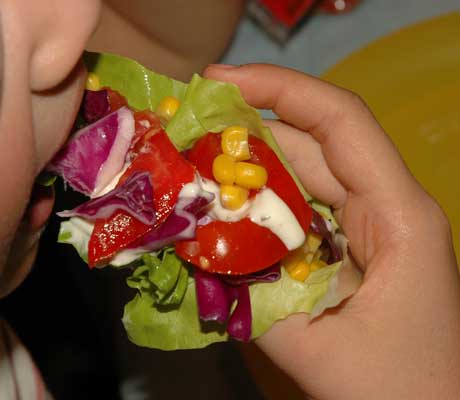
Choose Your Own Lettuce Wraps

A while ago I was planning on making chicken tacos and got them almost made only to realize I didn't have tortillas or chips.  Needless to say, I was annoyed.  After searching the fridge, freezer and cupboards I found some Romain lettuce and decided to just use the lettuce as the "tortilla."  They were wonderful, and I felt so healthy.  That said, I have found that butter lettuce works a lot better, but Romain works in a pinch.  The other night I decide to do a "clean out the fridge" and do lettuce wraps.  It turned out wonderfully.  I basically took anything and everything out of the fridge and cupboard that needed to be eaten, along with browning up some hamburger with onion and salt & pepper, although chicken or pork or no meat would work just as well, and set it all on the table.

I know the table looks crazy!
We then all sat down at put together whatever looked like a yummy combination.  Often, one of us would come up with a good idea and we would all copy.  It was such a fun, quick, and easy meal, and now my fridge is cleaned out.

Basically just put the ingredients in the middle of the lettuce and roll it up and enjoy

Here are a few of our favorites: (Printer Friendly Recipe)


Mexican Wrap
hamburger
cheese
onions
tomatoes
fritos
corn
taco sauce
sour cream

Asian Wrap
hamburger
onion
red pepper
cabbage
rice
soy sauce
chinese noodles (I realize they aren't GF but this was my plate, and I added them)
 
Pizza Wrap
Turkey Pepperoni
hamburger
Mozarella cheese

 Veggie Wrap
Tomatoes
cabbage
Onion
Corn
Red Peppers

Spicy BBQ
Hamburger
Mozzarella Cheese
Corn
Fritos
A1 Sauce
Green Taco Sauce


Coconut Shrimp
Coconut
Cooked Shrimp
I must admit this wasn't my favorite, I think I would have enjoyed it a lot more if I had had Cocktail Sauce -- Next Time

So next time you have lots of leftovers grab some lettuce and get wrapping!

Monday, October 18, 2010

Bacon Wrapped Chicken with Tomato and Onion Salad

Okay, I know your mouth is watering.  I know mine is just from seeing the picture.  You really should make this, especially since you can actually find yummy tomatoes right now -- Mine are from my garden, oh, how I love my garden (My husband's more precisely since I don't do much, but prepare food from it, but marriage is about sharing so it is mine - right).  Make this -- TONIGHT.  It is so easy it is almost scary.  The recipe is from Rachel Ray's "Chicken Clubs" in her 30 Minute Meals cookbook and when I found it I didn't have bacon and I was so disappointed the rest of the night that the minute I got bacon it was the first thing I made for dinner.  It is meant to be a sandwich, which is how about 1/2 my family ate it as, but my daughter just wanted it without bread so it is easily eaten wrapped in lettuce.

Bacon Wrapped Chicken with Tomato Salad (printer friendly recipe)
8 slices bacon
4 pieces boneless, skinless chicken breasts (I used 1/2 breasts)
4 toothpicks
Tomato & Onion Salad (recipe below)
Romain or Bibb lettuce
Toasted buns, or toasted bread


Pound the breasts so they are uniform thickness.  Criss Cross two pieces of bacon and place the chicken in the middle and wrap the bacon around it (like you do a ribbon on a present) Secure with a tooth pick.  Heat either a griddle to medium high or an outdoor grill  to medium or medium low and cook chicken for about 6-7 minutes on each side until the bacon is crisp and the chicken is cooked through.  While the chicken cooks make the Tomato and Onion Salad.  When the chicken is cooked make a sandwich with the chicken and salad, wrap it in a lettuce leaf, or just sprinkle the salad over the top of the chicken and enjoy.

Tomato & Onion Salad
3 tomatoes, thinly sliced into rings
1/4 medium onion, minced
handful of chopped, fresh parsley or 1 tsp of dried
1/2 tsp dried chervil (opt. but yummy)
Salt & pepper to taste
About 1 T olive oil

1. Mix all ingredients together and let sit until chicken is done.

Sunday, October 17, 2010

Inspiration

As you can see, I have been doing a little organizing of my blog.  As such, I have found tons of food inspiration which I have been sorely lacking.  There were a few times I wanted to hop up and start cooking something (Cookie Dough Brownies anyone?)  only to realize that would defeat the purpose of sitting here to organize.  I hope this helps you find some inspiration too.

Monday, October 11, 2010

Sweet & Sour Meatballs


I posted last week a recipe for meatballs.  Here is one way to use them that we LOVE!!!

Sweet & Sour Meatballs (printer friendly recipe)
1 C sugar (brown or white, your preference)
2 Tbsp Corn Starch
1/2 C Ketchup
1 20 oz can pineapple tidbits, including juice
Approx 20 Meatballs
Rice or noodles

In a medium saucepan combine ingredients and about 20 meatballs over med heat.  Bring to a simmer and simmer for 20 minutes.  Serve over rice or noodles.  Makes enough for 6 people.

Thursday, October 7, 2010

Aloha Bread

I love sweet breads, with the exception of fruit cake, I have yet to find one I don't love.  When I found some 1/2 dead bananas at the store the other day I immediately thought, I NEED banana bread.  So I bought some thinking I had enough for a GF batch and a regular.  OOPS, only enough for one batch -- who knew banana bread takes so many bananas.  So I went looking for something else to do with the bananas, because I didn't want my daughter to go without, or for us to eat all her treats.

I was looking in my Lion House Desserts cookbook which I LOVE.  On a side note these recipes are wonderful and since The Lion House is a restaurant in Salt Lake City all the recipes are created for high altitudes, which if you live in Albuquerque is a must.  I really need to get all their cookbooks because they are fabulous!  I have already adapted others for to be gluten free like their doughnut balls (which we had for an after-school snack yesterday), butter-pecan squares, or their wonderful, egg-free chocolate pudding.  In case you are wondering, I plan to continue until just about every recipe has a GF version written to the side of it!

Anyway, they had this recipe which called for just 1 C of mushed banana and then added pineapple, pecans, and coconut -- which if you've seen my carrot cake recipe you know is the trifecta of goodness so this recipe was just begging to be made.  After a little consideration I adapted it for GF and here it is.  I personally think it turned out fabulous and my daughter ate a whole loaf herself in about 2 days.  She loved it toasted for breakfast, and as an after school snack, in her lunch, etc.  I have some left in freezer that is waiting for me to surprise her with later.

Aloha Bread (printer friendly version)
1 C butter
2 C sugar
5 eggs
1 C mashed bananas
4 C GF flour mix
2 tsp xanthan gum
3 tsp baking powder
1 tsp soda
3/4 tsp salt
1 20-oz can crushed pineapple, drained
3/4 C chopped pecan
1 C coconut

1. Preheat oven to 325.  Grease 2 large 9x5-inch loaf pans and set aside.  In a medium size bowl mix the flour, xanthan gum, baking powder, soda, and salt.  In a separate large bowl cream the butter and sugar.  Add the eggs and beat well.  Stir in the bananas.  Add dry ingredients and blend well but do not over mix or else there will be tunnels and a coarse texture.  Add pineapple, pecans and coconut and mix together on low until blended.  Pour into the prepared pans (they should be about 2/3 full, use a 3rd pan or make muffins if necessary and cook a little less).  Bake for 60-80 minutes or until a toothpick inserted in the center comes out clean.  Allow to cool in pans about 15 minutes and then dump onto a cooling rack to finish cooling.

Sauteed Veggies

The other night I was trying to figure out what to cook.  I wasn't really in the mood to cook and since it was the end of the month we were low on supplies and I was trying to be good and not buy anything.  So after rumaging through my fridge I found 3 large baked potatoes from a previous dinner in the fridge and decided to add some other veggies to them and fry them up with a little seasoning.  It was delicious.   I was afraid I would miss the hamburger which is something I often fry with leftover baked potatoes, but I didn't.  I think we will be eating this more often.

Sauteed Veggies (printer friendly version)
1 T bacon grease (optional, but adds a great flavor you could just sub butter)
1 T butter
4 carrots, sliced
3 slices of onions cut into 6ths (see photo below)
1/2 green pepper, chopped
2 large or 3-4 small/med baked potatoes
salt & pepper to taste
1/2 tsp garlic salt
1/4 tsp smoked paprika
1/8 tsp cumin

1. In a large fry pan or skillet melt bacon grease and butter.  Add carrots and sautee for about 5 minutes.
Add onion
 one slice cut into sixths

and green pepper and cook until onion is soft.  Add potatoes
 
and seasonings.

Cook until all heated through and some of the veggies are slightly crispy brown.  Enjoy as the main dish of dinner with bread or as a side.  It would be yummy with meatloaf don't you think.  Hmmmm I think I need to buy some hamburger and make meatloaf now.

LinkWithin

Related Posts with Thumbnails