Showing posts with label Vegetarian. Show all posts

Monday, January 10, 2011

Mexican Rice


 I'm sure I have mentioned this before, but I love Mexican food. I love the cheese, I love the spice (just not too spicy, I still want to taste my food), I love the sauces, I love salsa, I love the corn tortillas, I love the beans, I love the corn, . . . Need I go on.  Anyway, the other day I made fajitas and thought how if we were at a restaurant they would serve these with rice and beans.  So I went looking for a good Mexican rice recipe and found one in my trusty The America's Test Kitchen Family Cookbook.  With a little adapting for spiciness and lack of a few ingredients it got made and was delicious!

Mexican Rice (printer friendly)
1 can of tomatoes
1 small onion, pealed, trimmed & quartered
1/3 C vegetable oil
2 C long grain rice
4 garlic cloves, minced
1 can diced jalepenos
2 C chicken broth
1 T tomato paste
1 1/2 t salt
2 1/2 T dried cilantro or 1/2 C fresh
Pepper
Lime juice

1. Preheat oven to 350 degrees and place the rack in the middle.  Puree the tomatoes and onion in the food processor. There should be 2 Cups of puree. Remove any excess so there is only 2 C.
I made A LOT of this since I wanted to freeze it for later.  So you would have a lot less than this for this recipe.

2.Heat the oil on med. heat in an oven proof dutch oven or pot.  Add the rice and saute until light golden brown.  This should take approx 10 minutes (lots more if you are quadrupling it like I did).  Make sure to stir often so the rice doesn't burn.


3.  Stir in the garlic and the can of jalepenos.  Cook until it smells like garlic & jalepenos (about 15 seconds).  Add the pureed tomatoes/onion mixture, broth, tomato paste, salt and cilantro (if using dried). 

Bring to a boil and then cover and bake for about 30-35 minutes or until all the liquid is dissolved and the rice is fully cooked. Be sure to stir after 15 minutes.
4.  Fluff with a fork and add cilantro (if fresh) and add some fresh jalepenos, if desired.

Monday, October 25, 2010

Choose Your Own Lettuce Wraps

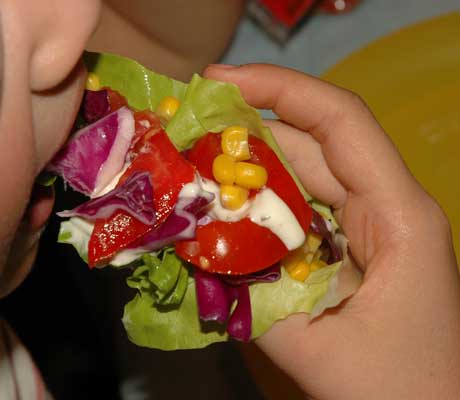
A while ago I was planning on making chicken tacos and got them almost made only to realize I didn't have tortillas or chips.  Needless to say, I was annoyed.  After searching the fridge, freezer and cupboards I found some Romain lettuce and decided to just use the lettuce as the "tortilla."  They were wonderful, and I felt so healthy.  That said, I have found that butter lettuce works a lot better, but Romain works in a pinch.  The other night I decide to do a "clean out the fridge" and do lettuce wraps.  It turned out wonderfully.  I basically took anything and everything out of the fridge and cupboard that needed to be eaten, along with browning up some hamburger with onion and salt & pepper, although chicken or pork or no meat would work just as well, and set it all on the table.

I know the table looks crazy!
We then all sat down at put together whatever looked like a yummy combination.  Often, one of us would come up with a good idea and we would all copy.  It was such a fun, quick, and easy meal, and now my fridge is cleaned out.

Basically just put the ingredients in the middle of the lettuce and roll it up and enjoy

Here are a few of our favorites: (Printer Friendly Recipe)


Mexican Wrap
hamburger
cheese
onions
tomatoes
fritos
corn
taco sauce
sour cream

Asian Wrap
hamburger
onion
red pepper
cabbage
rice
soy sauce
chinese noodles (I realize they aren't GF but this was my plate, and I added them)
 
Pizza Wrap
Turkey Pepperoni
hamburger
Mozarella cheese

 Veggie Wrap
Tomatoes
cabbage
Onion
Corn
Red Peppers

Spicy BBQ
Hamburger
Mozzarella Cheese
Corn
Fritos
A1 Sauce
Green Taco Sauce


Coconut Shrimp
Coconut
Cooked Shrimp
I must admit this wasn't my favorite, I think I would have enjoyed it a lot more if I had had Cocktail Sauce -- Next Time

So next time you have lots of leftovers grab some lettuce and get wrapping!

Thursday, October 7, 2010

Sauteed Veggies

The other night I was trying to figure out what to cook.  I wasn't really in the mood to cook and since it was the end of the month we were low on supplies and I was trying to be good and not buy anything.  So after rumaging through my fridge I found 3 large baked potatoes from a previous dinner in the fridge and decided to add some other veggies to them and fry them up with a little seasoning.  It was delicious.   I was afraid I would miss the hamburger which is something I often fry with leftover baked potatoes, but I didn't.  I think we will be eating this more often.

Sauteed Veggies (printer friendly version)
1 T bacon grease (optional, but adds a great flavor you could just sub butter)
1 T butter
4 carrots, sliced
3 slices of onions cut into 6ths (see photo below)
1/2 green pepper, chopped
2 large or 3-4 small/med baked potatoes
salt & pepper to taste
1/2 tsp garlic salt
1/4 tsp smoked paprika
1/8 tsp cumin

1. In a large fry pan or skillet melt bacon grease and butter.  Add carrots and sautee for about 5 minutes.
Add onion
 one slice cut into sixths

and green pepper and cook until onion is soft.  Add potatoes
 
and seasonings.

Cook until all heated through and some of the veggies are slightly crispy brown.  Enjoy as the main dish of dinner with bread or as a side.  It would be yummy with meatloaf don't you think.  Hmmmm I think I need to buy some hamburger and make meatloaf now.

Friday, June 25, 2010

Mandarin Salad with Sweet and Sour Dressing


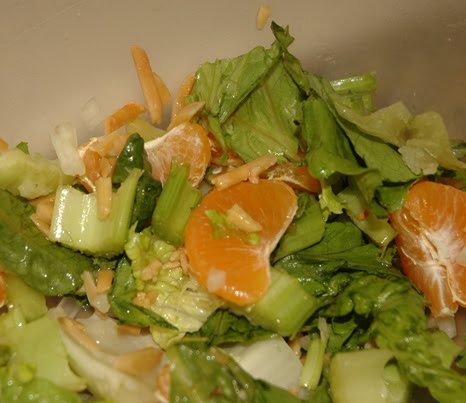
I love this salad, it is so quick and easy and delicious!  To make it a Main Dish you can add diced chicken.

Mandarin Salad with Sweet and Sour Dressing
      (printer friendly recipe)
1/4 C sliced or slivered almonds
1 T plus 1 tsp sugar
1/2 small head lettuce (I used green leaf), torn into bite-sized pieces
1/2 bunch romaine, torn into bite-sized pieces
2 medium stalks, celery, chopped (1 C)
2 medium green onions, thinly sliced or chopped sweet onion (2 T)
1 can mandarin oranges, drained or 4 mandarin oranges peeled and separated.
1 C diced cooked chicken, (opt)
Sweet and Sour Dressing (below)

1. In a small skillet on low heat add the sugar and almonds.

Stir constantly until the sugar melts

and the almonds are coated.

Break apart and set on a small plate and allow to cook completely.
2. Toss the lettuces, celery, onions, oranges, and chicken (if using).  
3. Make dressing.  1x's the dressing if you are going to pour over the whole salad.  2x's the dressing if you will serve it on the side.  Pour the dressing on right before serving.

Sweet and Sour Dressing
1/4 C canola oil
2 T sugar
2 T white vinegar
1 T chopped fresh parsley or 1 tsp dried
1/2 tsp salt
Dash of pepper
Dash of red pepper sauce.

1. Pour ingredints into a container that will close tightly.
 I have this salad dressing maker from Pampered Chef that I LOVE, LOVE, LOVE.  It has measurements on the side so I can just use those.  Doesn't the vinegar and oil look fabulous?

Shake all ingredients together and refrigerate until it is time to serve.

Friday, June 18, 2010

Pasta with Broccoli and Peppers


This is a recipe we use to make before we entered our GF lifestyle.  I don't make it as often since it is a bit more of a challenge but it is still delicious.  You can add chicken and it is really yummy, but I usually do it without any meat.

Broccoli Pepper Pasta (printer friendly recipe)
12 oz short cut pasta
2 C broccoli florets (fresh or frozen)
1 T olice oil
1/2 C diced red onion
2 cloves garlic, minced
1/2 C chicken broth
2 tsp balsamic vinegar
1/2 C diced roasted red peppers (or just red peppers)
2 T grated Parmesan cheese (opt)
1/4 tsp black pepper
2 T chopped fresh basil (opt.)

1. In a large pot cook pasta according to package directions.  If using frozen broccoli add when you add the pasta.   If using fresh broccoli add the last 3-4 minutes of cooking. or until pasta is tender and the broccoli has turned bright green.
2. While that cooks, heat a medium skillet on medium heat.  Add the oil.  Add onions and garlic.  Saute for about 2-3 minutes or until they are tender.  Add the broth and vinegar and bring to a boil  Reduce heat to low and stir in the red peppers and black pepper.  Cook for 1-2 minutes or until heated through.

 3. Drain pasta and broccoli and dump into a large bowl. Pour sauce over the top and toss.  Sprinkle with Parmesan cheese and basil (if using).

Sunday, November 22, 2009

Cookie Crust


This is a crust my mom created that is heavenly.  Basically it is a sugar cookie.  We use it for cream pies, refrigerated cheesecake, strawberry pie, and, my husband's personal favorite, banana cream.  Perhaps the best part is that it the GF version just requires a change in flour, no xanthan gum necessary.

Cookie Crust (printer friendly)
1 C flour (GF or regular)
1 stick of butter*, chunked
1/4 C powdered sugar

1.  In a mixing bowl combine all ingredients


With your fingers, mix together until the consistency of dry sugar cookie dough.

This works best if your hands are cold and you just use the tips of your fingers.

Press into an 8"or 9" pie pan.


2. Refrigerate for about 10-15 minutes.  Cook for 10 minutes on 400-degrees. Allow to cool completely before filling.
 

This crust is great for strawberry pie, any cream pie, and no cook cheesecake. 

*Use salted or add a little salt if using unsalted.

Saturday, November 7, 2009

Dried Beans

 A while back I mentioned using beans I had cooked from dried and frozen.  I freeze them in portions sizes equal to canned beans since most recipes call for canned beans.  The measurements are listed at the end.  You can do this with any dried beans you want except Kidney beans.  Apparently they have some issues, I just buy them canned.  Here is the process I use.  First sort the beans, removing the undesirable items like:
 
Split Beans

 
Shriveled &/or discolored Beans

 
And Rocks, yes I said rocks.

 
Next, place in a crockpot with 2x's the water as beans.  Or just fill the crockpot about 1/2 way with beans and then fill with water to the top.  

 
Allow to sit over night.  Dump water (makes the beans less gassy), and refill with water about 1 " over the beans.   Add about 1 tsp salt.  Make sure you add salt unless you buy unsalted beans, beans are like pasta & rice, no amount of salting will help if they aren't cooked in salt.  Set on high for about 1-2 hours to get the cooking process speeding along, and reduce to low and let cook for 8-10 hours.   The lower in elevation you are the less time you need and the higher the more time you need.

When soft, place in the refrigerator overnight to cool.  Then place in qt freezer bags. 
 
It is best to freeze the beans with some some juice so the beans don't dry out.  There is approx 1 1/4 C beans and 1/4 C juice in a can of beans.  Make sure to remove as much of the air as possible before closing the bag, it will help prevent freezer burn. 

You can use these beans as you would any canned beans, in casseroles and baked things or fresh.  They are delicious!

Friday, November 6, 2009

Apple Pie Filling

Don't these bottles look pretty.  Yesterday I made apple pie filling for the first time and it turned out fabulous (except for the one bottle that boiled all over the place, but I choose to forget that).  A friend gave us some as a Christmas present a few years ago and I have been wanting to do some ever since.  This year a neighbor let us pick apples from their tree so I was over flowing in apples and decided to give it a try.  Let's just say I will be doing this every year from now on.  It turned out so yummy.  I figure I can use it for pie filling, apple crisp, ice cream topping, oatmeal topping, to eat just plain, add to yogurt, etc., etc., etc. 


Apple Pie Filling (printer friendly recipe) 
Yield: 7 quarts
4 1/2 C Sugar
1 C cornstarch
2 t ground cinnamon
1/4 t nutmeg
10 C water
3 T lemon juice
1 t salt
5 1/2 - 6 lbs. apples


1. In a large pot on medium heat, combine the sugar, cornstarch, cinnamon, nutmeg and water.  Allow to cook, stirring until thick an bubbly.


 Isn't this pretty?
2. Turn off the heat and add the lemon juice and salt.
3. Peel/Core/and Slice the apples.*  Place them tightly into quart jars.


4. Pour the sauce over the apples leaving a 1/2" space at the top.  If the sauce is too thick to go down, heat over low until it is a little warmer.  I kind of dilly dallied in getting the apples done and this happened to me and after I heated it slightly it worked just fine.

 5. Wash rims and place two piece lids on as directed on the box.
 6. Process in a boiling water canner for 40 minutes. 

*I own an apple peeler/corer/slicer that I used to peel the apples.  I didn't core or slice with this tool since the slices would have been too thin.


I then used an apple wedger to make the wedges.


You could do the peeling, coring and wedging by hand, it would just take a little longer.

Thursday, November 5, 2009

Seven Layer Dip


In case you haven't figured out, I love Mexican.  Tonight we did simple and easy.  While Seven Layer Dip is traditionally served as an appetizer, I like to have it for dinner, with it light on the sour cream.  Yum!

Seven-Layer Dip (printer friendly recipe)
2 cans Refried beans
Guacamole
1 C Sour Cream (2 C if using as an appetizer)
1/2 pkg taco seasoning (opt -- 1 pkg if doing 2 C Sour Cream)
2 C Cheddar Cheese, shredded
1 small onion, chopped
1 med tomato, chopped
1 sm can sliced olives (not shown in photo)
Corn Chips or taco shells

1. Layer Refried Beans on the bottom of a 9x13 pan.  Layer the Guacamole on top (as much as you like, I did 1 1/2 avocados worth).  Next combine sour cream and taco seasoning, if using.  Spread on top of the Guacamole.  Layer Cheese and then top with onion, tomato and olives.
2. If you want you can add chopped avocado, shredded lettuce, jalapenos, black beans, or any other mexican like thing you think is yummy.
3. Serve with corn Chips, or use as a filling for a taco shell.

Sunday, October 4, 2009

Simple Pecan Topping

I came up with this when I wanted a pecan pie type filling for mini-turnovers and mini-pies.  This was what I came up with.  It is delicious and I think I am going to serve it on some ice cream tonight with some of the smooth peach pie filling.

Pecan Topping
(printable version)
1/2 C chopped pecans
1 T corn syrup
1 T brown sugar

1. Combine in a small bowl.  Serve as pie filling or on top of ice cream.

Smooth Peach Pie Filling

 
I originally made this for mini-turnovers and mini-pies since a regular pie filling would have been too chunky.  Thankfully, it turned out pretty yummy and would be great to make a smoother pie filling, or to use as ice cream topping or cheesecake topping, or, I just thought of this, top a cracker with some cream cheese and add some peach filling.  I am definately having that for my midnight snack.


Smooth Peach Pie Filling (printable version)


5-1/2 C peeled, & diced small*
1 C sugar
6 T cornstarch
1/2 tsp cinnamon
1/2 tsp nutmeg
dash of salt
3 T butter or margarine
1 tsp vanilla extract

1. Combine peaches, sugar, cornstarch, cinnamon, nutmeg and salt in a saucepan.  Let sit about 30-45 minutes or until a syrup forms (you won't see a syrup if you use a food processor).
2. Bring peach mixture to a boil; reduce heat to low and allow to simmer for about 5-10 minutes or until the peach pieces are tender.  Stir often.  Allow to cool.  I placed the filling in a bowl and set the bowl in a larger bowl filled with ice and stirred occasionally.  Took about 1 1/2 hours.  Use for ice cream topping, pie filling or anything else that sounds good.
*I put my peeled peaches in my food processor and pulsed a few times

Monday, August 31, 2009

Sombraro Pie


I have always loved this homey dish my mom made when we were growing up.  The seasoning was always just perfect and the crust was perfectly crispy, yet crumbly.  My mouth is watering and I just ate it.  For dinner tonight I actually doubled the recipe so that I would have leftovers which I will either freeze or we'll eat later in the week.  Another bonus, it is easy to make vegetarian and the flavor shouldn't change too much.  You could eat this with taco toppings if you desire, personally I just like it plain.

Sombraro Pie
(printer friendly recipe)
1/2 lb hamburger*
1 (14 oz) can black beans, drained*
1 lg onion, sliced
1 can diced tomatoes
1/2 C beef or veggie broth
1 can whole kernal corn (or 1 1/4 C frozen corn)
1-2 T chili powder (I do 1 1/2 T)
1 tsp salt
1/4 tsp pepper
1 1/4 C GF Flour blend**
1/2 tsp xanthan gum**
1/2 C cornmeal
1 tsp salt
1/2 C oil
3 T cold water

1. In a large skillet brown meat and onion, adding beans when almost cooked.  Add tomatoes, broth, corn, chili powder, salt, and pepper.  Simmer for 10 minutes and pour into a 2 qt baking dish (pie plate, 11x7, 9x9).


2. While the sauce is simmering make the crust by mixing the flour, xanthan gum, cornmeal, and salt in a small mixing bowl.  Add oil and mix with a pastry blender until mixed.  Add water if too thick, it should be the consistency of soft, sticky, playdough.  Cut 2 pieces of wax paper slightly longer than the pan you will be using (just worry about the length of the paper, the width of the paper is enough for all the pans).  Place the dough between the paper and roll out to the size of the pan.


Place pastry over sauce and cut a hole in the middle (I cut a few holes since I doubled the recipe and did it in a 9x13).


3. Bake in a 400-degree oven for 30-35 minutes (35-45 minutes for a 9x13) or until the top is lightly browned.  Allow to sit for about 5 minutes before serving.


*Or 1 lb hamburger or 2 cans black beans
**For non-GF just use all-purpose and leave out the xanthan gum

LinkWithin

Related Posts with Thumbnails